Deployment Procedure
To view the functioning Chatbot, you must host the NodeJS application on a remote server and configure the SwiftChatbot application portal to connect with the NodeJS application.
Steps to deploy
Setup EC2 Instance: To set up an EC2 instance (if not already done or if you wish to set up a new instance) in the ap-south-1 region with Ubuntu AMI, 16 GB storage, and t2.small compute power, follow this: Ec2 Instance Setup Guide
Note
Download the generated .pem file and store it securely on your local system. This file will be used for SSH access to the EC2 instance.
SSH into Instance: Use the following command to SSH into the instance with the provided .pem file:
ssh -i "<Your_PEM_file_name>" <Your_Host_IP_address_or_Domain_Name>To set up the necessary software components, follow these steps:
- Update and upgrade the system packages:
sudo apt updatesudo apt upgrade
Install Node.js, npm, Nginx, and PM2:
sudo apt install -y nodejs npm nginxsudo npm install -g pm2- (Optional) Install MySQL if you prefer setting up a local MySQL instance instead of using AWS RDS:
sudo apt install -y mysql-server
- Configure the MySQL root password:
sudo mysql -e "ALTER USER 'root'@'localhost' IDENTIFIED WITH mysql_native_password BY 'mypassword';
Tip
If the root password does not change using the command above, follow the instructions provided here.
Note
If you are using AWS RDS, create a new user and grant all permissions. These credentials will be used when setting up the .env file later.
Update .env file: To include the .env file in the cloned project root directory, you have two options:
Option 1: Create the .env file directly in the project root directory:
Navigate to the project root directory.
Execute the following command to create and open the .env file in the vi editor:
vi .envPress “i” to enter insert mode.
Paste the contents of the .env file (you can obtain it from your local .env file or ask your team leader for it).
Press “ESC” to exit insert mode.
Type “:wq” and press Enter to save and exit the vi editor.
You can verify the content of the .env file by running:
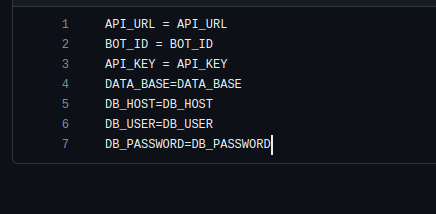
cat .envHere is an example of how the .env file appears and the credentials it contains:
Option 2: Use SCP to copy the .env file from your local computer to the host computer:
Before proceeding, ensure that you are logged out from the host machine or open a different terminal window.
Use the following SCP command format:
scp -i <PATH_TO_PRIVATE_KEY> <LOCAL_FILE_PATH> ec2-user@<EC2_PUBLIC_IP>:<REMOTE_PATH>Replace:
<PATH_TO_PRIVATE_KEY> with the path to your private key file.
<LOCAL_FILE_PATH> with the path to the .env file on your local computer.
<EC2_PUBLIC_IP> with the public IP address of your EC2 instance.
<REMOTE_PATH> with the path on the remote EC2 instance where you want to copy the .env file.
These options allow you to effectively include the .env file in your project directory, providing the necessary configurations for your application.
Configure Nginx: To configure the NginX server, follow these steps:
Open the NginX configuration file located at /etc/nginx/sites-enabled/default using the vi editor:
sudo vi /etc/nginx/sites-enabled/defaultPaste the following configuration into the file:
root /usr/share/nginx/html;

# Add index.php to the list if you are using PHP
index index.html index.htm index.nginx-debian.html;

server_name localhost;

location / {
         # First attempt to serve request as file, then
         # as directory, then fall back to displaying a 404.
         # try_files $uri $uri/ =404;
         proxy_pass http://127.0.0.1:3000;
         proxy_http_version 1.1;
         proxy_set_header Upgrade $http_upgrade;
         proxy_set_header Connection 'upgrade';
         proxy_set_header Host $host;
         proxy_cache_bypass $http_upgrade;
}
Start nginx server:
sudo service nginx startStart your application server:
- Go to the project root folder where repository cloned
cd ~/khabri-meda
- Install dependencies
npm install
- Start application server via PM2:
pm2 --name <bot Name> start npm -- start
Test whether your server is running: Hit the host-ip address or domain name of the EC2 instance in the browser.
For example: http://ec2-3-110-217-147.ap-south-1.compute.amazonaws.com/usern.
It should return something like this: {“message”:”Cannot GET /”,”error”:”Not Found”,”statusCode”:404}. This is expected because /user is a POST api. You can confirm it by posting some content using Postman or curl on your system.
Webhook url setup
Once you have setup the instance, you need to set the latest Webhook url onto Swift Chatbot developer’s dashboard. To set up a webhook on the Swift Chatbot Developer Portal after setting up your instance, follow these steps:
Log in to the Swift Chatbot Dashboard Portal at: https://dashboard.swiftchat.ai/bots.
Once logged in, you’ll see a list of apps that have been created. Look for the bot you created earlier in create your chatbot and click on it by selecting the “>” icon located on the right side of the app.
In the app settings, find the section for entering the webhook URL. Enter the following URL:
http://<EC2 host IP address or domain name>/userFor example:
http://ec2-3-110-217-147.ap-south-1.compute.amazonaws.com/user
This webhook URL will enable communication between your Swift Chatbot application and your EC2 instance. Adjust the URL according to your instance’s IP address or domain name.